 |
| Lumber |

Monday, September 27, 2010
TAKING SIDES
The siding has been on the shed for about a week now and we got most of the trim attached Saturday. We took Sunday off. All of the holes from the previous nails and screws have been filled putty, cracks and crevices filled with caulk and we are almost ready to paint... just as soon as we finish that trim work.
 |
| Mostly re-used siding with the exception of 3 new pieces we had left from the office build. |
 |
| Mapping out the placement of the siding to make sure we use the tallest pieces on the back wall. |
 |
| In some cases we had to piece together a few sections as seen on the left side. All of these seams will get covered with the trim. |
 |
| That's a lot of putty and caulk. |
 |
| I kind of love this mess of a wall... BUT I could never live with it. These were the test pieces we used when trying to determine the color for the office build which we talked about here in a previous post last summer. |
 |
| We were lucky to have just enough full sheets of siding for the side-backs and back walls. The area around the window was pieced together. |
 |
| Inside... soon to be painted all white. |
 |
| Trim on... well missing the bottom band. |
 |
| Once we get the last bits of bottom trim on and all the puttied holes sanded we'll be ready for paint. I'm kinda looking forward to not working on it for a few days. |
Sunday, September 26, 2010
ALL RAMPED-UP
In order for us to be able to get the lawn mower into the shed, we need a ramp... so we built one using the last few boards of composite decking and some paver that were laying around from when we bought the house.. We actually have one 9 foot piece left which will come in handy if we need to make any repairs.
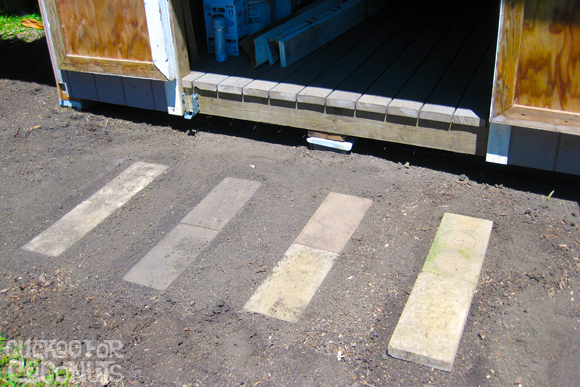 |
| Pavers in place and leveled for ramp joists. |
 |
| Ramp joists in place. |
 |
| Blocking added for stability. |
 |
| We added a strip of that sticky-backed felt and tar material which helps stop water from entering the wood joists via the screw holes. Water entering into the joists through the holes will cause the joists to rot. We also painted the small white sections of felt that would should through decking green. |
 |
| The final board had nowhere to be attached to... so we devised this. The last board that rests on the joists is attached to the board that meets the ground with 3 sections of decking underneath... |
 |
| The double board is set into place and the ends of the joists lock into the grooves. The upper board is then secured to the joists with deck screws. |
 |
| Perfect fit... minus the foot. |
 |
| Once in place we added gravel and a few composite deck blocks for extra stability of the lower board. |
 |
| As you can see the siding is also on... look for that in the next post. |
Wednesday, September 22, 2010
A ROOF OVER OUR SHED
Despite the fact we have not posted about the shed in awhile we have been working on it, along with our regular design work. Last week we managed to get the facias, perlins, roof and siding on. So that the post won't be too long, I am focusing this post on the roof. It's really shaping up to be a cute shed and the fact that it is 95% recycled is still a miracle to us.
 |
| Here you see how we added the facia to the joists. The facia's are the outer boards around the joists... this front board will be where the gutter gets attached. We clamped a small piece of wood to the front facia to hold one end of the side on and in place while the opposite end was nailed on. |
 |
| John attaching the opposite end of the side facia to the back facia. |
 |
| Facia's in place, we are now ready to attach the perlins that will sit on top of the joists. |
 |
| 2x4 perlins run along the top of the joists in the opposite direction. The roof will get nailed to these perlins which also create more stability to the structure. |
 |
| Here I am attaching the perlins to the outer edge of the back facia. |
 |
| Here I am installing small 2x4 blocks between the perlins, otherwise there would be a 1-1/2" space between the roof and the joists. The 2x4 blocking will hopefully keep out unwanted wasps, and other critters. |
 |
| All perlins in place and ready for the metal roofing. |
 |
| We have 2 types of metal that were used on the last roof. Here you see the galvanized sheet. The other is aluminum. We found out that the aluminum and galvanized should not be used with each other as they will cause the galvanized to rust... as you can see on the right end. we need to do a combo again unless we wanted to buy more roofing... so it is a bit of a patchwork. The sheets were not long enough to use whole so we decided to gut off the rusty bits. |
 |
| Here you see where the galvanized will overlap the aluminum. So what we did was adhere a sticky-backed tar roofing material where they would touch. Hopefully this will prevent accelerated rusting... if any. |
 |
| Roof is on and ready for siding. |
 |
| How cute is this garden shed under the swaying palms? |
 |
| Here is a shot looking from the office out t the shed. |
Coming up next: The siding and entrance ramp.
Tuesday, September 21, 2010

Tuesday, September 14, 2010

Thursday, September 09, 2010
WORKING AN ANGLE
The last few days have been a bit slow on the shed project as we worked in the yard all day Monday and Tuesday we had friends visiting from the mainland. Yesterday we finally got to jump back on the project and were able to get all the roof joists installed.
 |
| The roof joists are laid out on the floor and prepped for installing. |
 |
| Since the roof is slightly angled, the joists themselves needed to have the ends cut at a slight angle so that when installed the ends sat perpendicular with the walls. |
 |
| With all the ends cut... both ends... the joists are ready to go. |
 |
| One down… 9 to go. |
 |
| Joists done. Now we need to install blocking, the purlins that the actual metal roofing with attach to, the fascia and the actual roofing. Looks like is happening today... should the rain stop. |
 |
| Pretty darn cute huh? Hard to believe this is only 198 square feet. |
Tuesday, September 07, 2010

Sunday, September 05, 2010
WE'VE BEEN FRAMED
As of Saturday evening we are right on schedule with the shed build.
All wall frames are up and Monday we will start the roof joists. Here are some pics of the framing form the last few days.
All wall frames are up and Monday we will start the roof joists. Here are some pics of the framing form the last few days.
 |
| That pile of wood in the top image is the old walls from the previous shed. The old pier blocks to the right were used as the foundation. In the second image, we laid out all of the walls to see just what we were working with. We managed to keep one wall intact and the rest we took apart and reassembled. |
 |
| The west wall laid out and ready to be hoisted up. |
 |
| West wall in place. Sliding barn door will go on the far right end and a window on the left side. |
 |
| West and north walls up. The east wall was put up in two sections. |
 |
| Section one of the east wall with the window. |
 |
| All four walls in place and braced. This front (east) wall we pretty much kept in tact from the original shed, we just flip flopped the window to the opposite end. |
 |
| We have about 3 little blocks to add in the opening above the door on the south end. Double doors will go here with a ramp for the lawnmower. Tomorrow we will start the roof and HOPE to have that all complete by Wednesday. Then we start in on the siding and trim.... then paint... then? |
Friday, September 03, 2010
WE'RE FLOORED!
Ok... this is kind of a long post as we are trying to play catch up...
With all of our plants out of the way and the dirt somewhat leveled out, we mapped out the area in which the garden shed would sit. Anything under 200 sq. ft. does not require a building permit so we designed the shed to be 18' x 11' which comes in just under 200 sq. ft.
The shed is pretty much being made from the old shed we tore down so we could build the office. With the exception of six 16 foot long 2x6's that we had to buy for additional roof joists. So all but those, nails and some door hardware and this is pretty much a free structure for us. Oh did I mention John and I are the only two building it? With the help of our amazing team from Mauka Builders last summer on the office construction (we still owe you images of that finished project... soon we promise), we learned a lot more than we already had already stored in our construction data base... that and the aide of some internet videos.
We have already erected 2 walls as of yesterday and hope to have all 4 up tomorrow as well as the roof joists by Sunday, but we have other yard chores that need to take priority.
Here are a few illustrations we did on the computer to design the shed followed by some step by step images. It will be painted to match the office and house... orange doors and all.


 |
| First we placed 1 stakes at each corner and connected with string to determine the footprint and size and placement of the shed. You can see the avocado tree there behind the blocks.. it's just to the right. We are hoping that the shed will block some of the wind that tortures the poor thing and not blow the flowers off before they have a chance to fruit. |
 |
| Once the footprint and placement were determined, we then placed 2 stakes outside each corner (top image) so that the string would criss cross over the true corner. This also allowed us to dig out the dirt for each footing unimpeded by any stakes. The string was also set at the proper height so each corner was level. The pier blocks were then lined up with the string to make sure they were square (bottom image). Gravel was added to the bottom of the hole for the blocks to rest on. |
 |
| Once the outside blocks were set, a straight board was placed on top and the levels checked. Knowing that the outsides were level we dug holes for and placed the center blocks. Once all were level we attached the outside base and floor joist lip. Rather than using joist hangers, we used 2x6's on their sides to act as a lip to hold the floor joists. This allowed us to use up wood from the pile and save us from having to buy joist hangers. It also save on time as the joist hangers are 4 nails each end and by doing the lip method allowed us to use 2 nails on each end. The lip only runs the 3 lengths of the shed and not on the ends. You can see it in the nearest front corner in the 2nd image. |
 |
| Next we gathered all of the used 2x6 scraps we were going to use for the floor joists and roughly placed them into position - 16" on center (top image). John then began marking and cutting while I nailed them into place. |
 |
| Top 2 image shows the floor joist lip and where I went along and pre-nailed where the joists would go while John was measuring and cutting the boards. This way I could just zip down the line once the boards were cut without having to fumble with nails and trying to hold boards in place. I'm a bit OCD that way. |
 |
| By the end of the day we had all the floor joists in place and blocked. The blocks are the short boards placed between the joists to add stability. |
 |
| We still had a few hours left in the day and wasted no time getting the floor boards in place. I picked up all this Trex composite decking from our neighbors in trade for a small design project. We had the perfect amount with enough left over for a ramp. In the top image you can get a better view of the floor joist lip and can see where we placed a 2x4 on the outer edge to act as the bottom of the wall frame. The floor boards will set within the wall frame. |
 |
| The next day we started cutting and placing the floor. At first we were going to square each board off as they were all mitered from being used in a previous decking setup, but decided we could just use them as is. |
 |
| TAH-DAH!!! A little stage! |
Subscribe to:
Posts (Atom)