Tuesday, October 26, 2010

TUESDAY'S TEXTURE 102610

Today I came across an article on NPR  about photographer Cedric Pollet and thought it would be a perfect post for Tuesday's Texture. Cedric has been traveling the globe photographing bark and has a 190 page coffee table book with over 220 species in over 400 photo's.  Does this guy have MY DREAM JOB or what?

This type of manzanita grows in the San Luis Obispo region of California. Its reddish-purple bark starts to peel in early summer. Photo from Cedric Pollet's upcoming book -  BARK.


We actually have a few of the Rainbow Eucalyptus trees here in the yard and they really are a favorite for their peeling and ever changing colored bark.

A detail of our very own Rainbow Eucalyptus.

Monday, October 25, 2010

SPRAY IT DON'T SAY IT

We're finally done painting the bulk of the shed. Here's a pic showing how it looked all primed.

At first I thought we'd save the time and primer by just priming the parts that had bare wood, which was about one third of the surface area. The rest was painted already since we reused wood from the old shed. But then I feared that I'd encounter problems putting on the final colors. Trying to get even coverage over those two disparate tones didn't seem like a good plan, so I went ahead and primed the whole thing, only doing a light spay over the old painted parts.

I have a love/hate relationship with our paint sprayer. I love it because it was cheap, I hate it because it's cheap! Actually, it's ok. It has served us well, but there are drawbacks--the gun doesn't swivel so I end up wrangling with the hose a lot trying to get the right position from which to spray. And it's a pain to clean and keep the spray nozzle clear of hardened paint bits. But it makes up for these shortcomings by maximizing time and effort, especially in the under roof areas that would be laborious and time-consuming to paint with a brush and roller.

This is our paint sprayer. Costco purchase with a coupon. It's airless so the motor only kicks in when you are spraying. Also, it's not very loud. There is only one spray nozzle though and you can't vary the width of coverage.

Done with the top layer of Green Grove. The bottom layer was sprayed with a color called Loam (seen in the next pic). This type of siding (known as T1-11) presents problems when using a sprayer. It has a very rough texture which means I had to hit it twice as many times as the pre-painted areas, especially when those two differently textured surfaces are side-by-side. Also, it's hard to get the paint sprayed into the grooves at the same coverage rate as the flat surfaces which means going in afterwards with a brush and just jamming the paint in there. Finally, I had to ease up on my distance and spray strength when I came close to the smooth-surfaced trim, otherwise it would glob on whereas on the heavily textured surface of the siding, that wasn't a concern.

Here is the outside finished. I don't know why I didn't just prime over the orange. The doors will ultimately be some shade of orange so I guess I thought there was no need.


There I am spray painting the first coat for the interior. The paint droplets look like snow in the blast of camera flash.

For the interior paint, we headed over to Community Work Day to see what they had in the way of free paint. They accept unopened and opened containers of paint and offer them to anyone in the community who can make use of it. We picked up two slightly-less-than-five-gallon buckets of white and mixed them together. It resulted in an off-white, vanilla color. No primer for the inside, just two coats of the free stuff.


Thursday, October 21, 2010

SWELL TIME

A week or so ago we stopped by Ho'okipa Beach Park to take in the surfing frenzy from the  first real swell of the season. Here are  few pics.


Wednesday, October 20, 2010

TUESDAY'S TEXTURE 101910

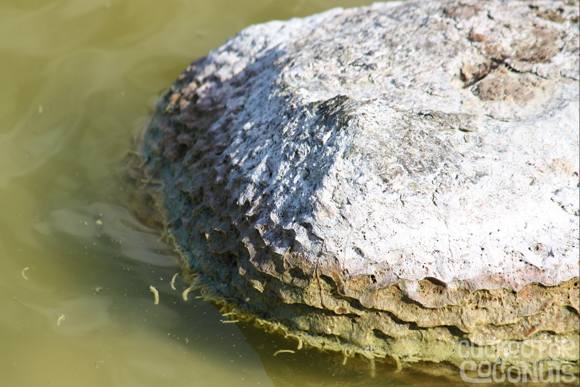
Rock in a pond that has layers and layers of pond scum covering it which gives it the scalloped edge.

Friday, October 15, 2010

WE WAS POOR BUT WE WAS LOVED...


Late last year Amy Sedaris began work on her newest book - Simple Times - Crafts for Poor People - and asked me to do a few projects for it. You might remember I did paintings for her last book back in 2006 - I Like You - Hospitality Under The Influence.

She thought I would be the perfect person to make the coconut crafts and I jumped at the chance. I also knitted golf club covers, made award ribbons, and some "native" jewelry.

As the book progressed Amy began talking to me about lettering options for the cover. We have an old lettering book from the 40's that has great examples of novelty lettering and I thought she would really like the the title spelled out in ribbons.

One day I just whipped up this sample to show her what it could look like and next thing I know I was designing the cover layout. Megan Whitmarsh and Vickie Farrell embroidered the subtitle an author name. After playing with a few color versions... it would seem as this is the cover they are going with. The thing I love about working with Amy is that she is so over the top yet loves to pull back when needed. This cover is spare yet chock full of information... She has a great eye for when things are too much... or for when she needs it to be too much.

Our friend Jason Frank Rothenberg shot all the photo's including the cover and our friend Lauren Smith of The Curiosity Shoppe made the cute little dog as well as a few other amazing crafts featured in the book like felt fruit jewelry and sugar skulls.

I got to see the first draft of the book recently and can tell you it is brilliant. Hold onto your hats... it's gonna be another HIT! Due out November 2, 2010.

I'll post some of the projects I did for Amy once the book is released.

Thursday, October 14, 2010

DESIGN PERCUSSION

Many of you know about my love of album cover designs from the mid 20th-century. Also, that I sometimes repurpose them. Occasionally I run into one though that is too beautiful to even consider dismantling. Such as those designed by Sam Suliman, which I've blogged before. Here I bring to your attention the wonderful work of S. Neil Fujita. I've had "Big, Bold and Brassy" for a while now, transferring it hither and dither, office to home, home to office. Then, routing through a pile of LP's in a resale shop here on Maui, I think I may have let out an audible gasp when I found "Percussion Italiano" One, it's orange! Two, it's italian! eh, oh, fuggedaboudit! It's replaced "Big Bold and Brassy" as my favorite. Much to BBB's dismay no doubt. And I've always preferred the Grand Award record label logo over the Command Records anyway. Sorry BBB. Can you tell, I go cuckoo for these things? Also included here is a book cover by Neil with a similar illustration style as Italiano.

Here's a link to a good interview with Neil by Steven Heller for the AIGA.

Also, Neil is a talented abstract painter who used his paintings in many of his designs as shown here for some advertising designs and here in this album cover work (scroll to the bottom for the Mingus and Brubeck covers)

Random Hawaii connection, Neil was born in Waimea in 1921.

Finally, Ruder-Finn has published his autobiography,  Mouth of Reddish Water: A Japanese American Story.


Sunday, October 10, 2010

DRINK PINK


The past few weeks we have been inundated with guava. They are everywhere. The trees and ground are full of yellow polka dots. A few days I decided to take a new approach to using these delicious pink fruit by making something other than cheesecake or jam. JUICE. Little did I know I would spend 6 hours peeling, cooking, pulping, straining, boiling, straining and enjoying. I cooked about 25 quarts of guava and ended up with about 10 quarts of juice. If you cooked down about 45--50 guava it might take about 1-1/2 hours. Jam is quicker and lasts longer but this juice is delicious... not to mention nutritious.

Check out this link to see all the great health benefits guava has.

Hundreds of fresh guava. 5 tote bags full in total.
Peel and chop. Cook until soft.
I prefer to use the firmer, immature guava and not ones that are too soft or over ripe. 
Remove seeds from cooked guava with a food mill. Guava pulp.
Run the guava pulp through a mesh strainer to remove the fibers and any small seeds that made it through the food mill. Add the thinned juice to a 5 quart pot and add water and sugar. 3 quarts of pulp, 1-1/2 quarts water and 1 cup of sugar. Boil about 10 minutes until sugar is dissolved. Adjust to taste.
Run the water/pulp/sugar mixture through cheesecloth. You have to stir it in the cheesecloth until all the liquid runs through. Small batches work best. And there you have your guava juice.
Refrigerate and serve.

Monday, October 04, 2010

TUESDAY'S TEXTURE 100510

Cycad leaves.

FAIR PLAY

Friday night we made our way to the Maui County Fair where we enjoyed some really good food, got to people watch and check out crafts and Orchidland. My main reason for going was the food and to take some pics of the rides all lit up.

Most important part of the fair is the food. John had the smoked meat plate while I had a the orange chicken pork lumpia and a corndog...
YOU HAVE TO HAVE A CORNDOG AT THE FAIR!
After that we shared a bag of sugary malasadas. These were not from Leonard's, but still good.

Ferris Wheel

LIGHTS!


Prizes.

Crafts were a bit odd. I did love the lei made form an old cut up dress. The miniature Christmas trees were rather peculiar… especially under that plastic shield.

We did admire the origami tree.

My favorite piece of art by a 4th grader.


2 beauties from Orchidland.

How does one judge mac nuts and sad wilted lettuce?

Juicy fruits.

Bamboo shoots and hot peppers. Still wondering how they come to a decision on best in show.

Fanciful feathered and furred friends. I fell so sorry for all the poor animals cooped up in tiny pens and cages.
So many people taking pics with the blinding flash right in the poor things faces was a bit upsetting. i used no flash and all was just fine. Why don't people think about this sort of thing?

After I saw these cute donkey's I begged for one. Not gonna happen I'm afraid. This cow was such a beautiful color.

Our last stop before heading home was for a bag of cotton candy and sugared nuts.
Oh the headache that followed.

Sunday, October 03, 2010

WAX NOSTALGIC

I figured it was about time I blogged about my friend BJ's bright new venture called Relight Candles.


Back in the day, I could not go thrift shopping with BJ and her sister Denise without being egged on to buy more than expected. They're very persuasive with a good eye for vintage finds. Every once in a while, I'll get a surprise "I-saw-this-amazing-thing-and-had-to-buy-it-for-you" package from either of them. Once, a very hurried Denise did a "drive-by" She deposited an awesome vintage lamp in the lobby of our apartment building in New York with instructions to the doorman to ring us up. No time for a note, or a handshake or a big thank-you hug. I only found out later who it was that actually dropped it off!

BJ has a special knack for the thrift store vintage score. On one occasion, she sent me these amazing Thermos bowls with pointy little Jetson's-style feet. We still have them and use them regularly.

So it's no surprise that she turned her shopping spidey senses into a business with an green side. Using all manner of nostalgic vessels—planters, glasses, vases—to make soy-wax candles, she upcycles what might be easily discarded into something to be admired and illuminated.

You can catch her selling her wares at some of the upcoming holiday craft fairs:
  • Patchwork, Santa Ana and Long Beach (see ad for dates)
  • Unique LA, downtown LA December 11 and 12 (see add below)