Sunday, August 29, 2010

HEDGE FUN

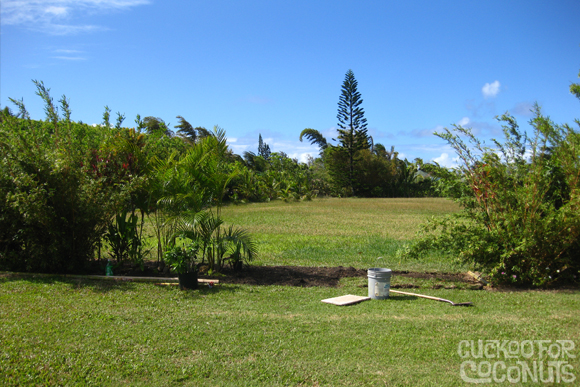
We continue this post with more on the hedge planting and the prep of the new garden shed we have started building in the old nursery area.

Soon after we moved in back in March 2007, we began planting seeds and starts in a small nursery area out near the garden. We were not sure what would become of these plantings at the time, but it was fun to watch them grow. All of what was planted in this area has been relocated to new areas all around the yard creating either privacy, windbreaks or landscaping around the water tanks. The areca palms make somewhat of a mess as well because they constantly drop their fronds. I can go and clean up 30-40 fronds one day only to have to do it all again a few days later. BUT, that only takes 10 minutes and we don't have to break out the hedge trimmers like we would on the hibiscus. Just trimming those, picking up the cutting then hauling to the mulch pile is an all day affair.

It's understandable as to why people like wide open spaces with not much planting because the more you plant the more you have to maintain. We are learning to plant things that require little to no maintenance. Certain hibiscus are way too time consuming and need to be cut back every few months or they get leggy... meaning the bottom part is not covered in growth which is mainly caused from a lack of light due to the tops being to dense. Red ginger is a bit of a pain as well because it spreads so quickly. We love the red ginger, but tend to plant that in out of the way areas.


Me planting the areca palm seedlings and some ti in the nursery April 2007. This is now the site of the new shed.

February 2008. The areca palms that were planted in April 2007. Not too much growth.

The areca one year later in February 2009. They shot up from about 8" to almost 3 feet.

And in June 2010. From 3 feet to about 8 feet in a year. We really wanted to move these last summer, but the office construction put the yard maintenance on hold.

Another view June 2010. There were about 100 palms packed in this tiny area.

Here you can see the clumping action of the areca palms and how they send off a new trunk at the base. Notice the intricate root system which made these oh so difficult to remove..
Many roots were broken during the dig, but the great thing about palms is that they are always making new roots as older roots wither away.

One of the 15 foot sections that had not been planted along the north hedge. First we have to dig up all the grass, turn the dirt and transplant the palms.

One section down. We also add a row of ti in the back. The stalks of ti will make a sort of fence that will hold the fronds and cuttings from blowing over into the neighboring yard. Most of the dead fronds were trimmed off before planting then I trimmed more off leaving only 2 per plant plus the new center shoot so that they do not have to pull so much water up through shocked roots. You can see a better example of that in the next image.


The 2nd 15 foot opening we just filled in with an assortment of areca, ti, rainbow dracaena and asparagus fern. We left a 3 foot opening next to that red bush so that we can access the back side and keep it maintained. We also left a 3-4 foot buffer from the property line on the backside.


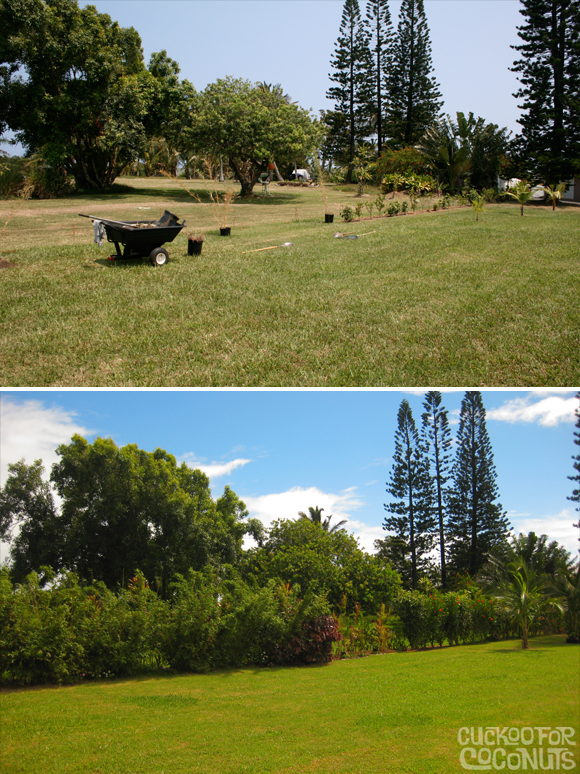
Once mature, the hedge will start to look something like these. The top image is our front hedge and is about 12 feet tall. The bottom image is in our gulch and this clump is over 30 feet tall and is also the parent plant to all of our seedlings.

Next up: The south hedge and berm.

Friday, August 27, 2010

RED, HOT + BLOOM

Today finds us continuing our floral series. I had been waiting for the 2 Royal Poinciana Trees to be exploding with color and a few weeks ago they did just that. Right now they are all green with giant seed pods and by January the trees will be bare again. Stay tuned for purple soon. We have some real beauties getting ready to bloom.
The blooms of the Royal Poinciana look quite orange here because they are bathed in golden sunlight.
Royal Poinciana
Royal Poinciana 
Royal Poinciana petals
Royal Poinciana detail
Crown of Thorns
Red Hibiscus
Hanging Heliconia
Hanging Heliconia
Various Heliconia
Red Hibiscus
Red Ginger and Begonia
Jatropha
This is called a Red Canna Lily, but it's not a lily at all. The seed pods to the right dry up and inside are small perfectly round black seeds. The seeds drop to the ground and produce more and more and more cannas. The seeds are used for jewelry as well as 'uli'uli.

Thursday, August 26, 2010

A LIVING WALL

I've managed to find a way to post images... although it's not as easy as it should be...
but the posts must go on!

This post is rather long overdue and actually comes to you as we are starting a few new projects here at CFC headquarters.

We started planting this hedge back in March of 2008. We loved the openness of our property connecting with the adjoining property... but we wanted a bit of privacy. It started out as primarily red hibiscus and panax and later expanded into areca palms, sumatran lilies, curly panax, ti, clumping bamboo, rainbow dracaena, song of india, asparagus fern and more. I don't very much like the idea of the hedge being all one type of plant, but rather more natural and organic. That being said, it's a lot easier to maintain a panax hedge as you really only need to trim it once a year. The other plants constantly drop leaves and at times makes for a bit of a mess in the early stages of the hedge. Once the plants fill and mature the dropped leaves are not as noticeable.

I'm proud to say that not a single plant along this hedge was purchased. We either started all of them or in the case of the bamboo... I did a work for trade with a client. I got one large clump of bamboo and divided it into about 12 smaller clusters. As you can see, they took off quite well. We plan to divide these into a few new clusters and use elsewhere in the near future.

Once the plants were in the ground it seemed as though they would never fill in. Two years later it's nearly full and it happened before we even knew it. There is a saying here in this part of the island that if you stick a broom stick in the ground it will grow. We almost believe it, but it didn't work with that broken shovel handle we used as a stake. We had 2 sections in the hedge we had not been able to get to in the last year and just finished planting with new areca palms and ti within the last 2 weeks. More on that and where the plants were transferred from in the next post... which will lead us into our new project details. Stay tuned...

Looking across the lawn towards hedge August 23rd, 2008 and today. The palm trees have gone from 1-1/2 feet high to now about 12 feet tall each. Notice the small black pots at the base... those are 40 new coco palms that we need to get in the ground later this fall.
Midway along the hedge September 14th, 2008 and today. To the right you can see the small panax and hibiscus starts in the before shot. Today they stand at over 7 feet. They were about 10 feet but i just trimmed them so they would fill in more on the bottom.
The mid section with bamboo starts on September 14th, 2008 and today.
Looking from where our white fence ends back to the N/W corner August 23rd 2008 and today.
The panax and hibiscus are now 6 feet taller than when planted.

Far N/W corner September 9th 2008 and today. Right in the middle of the before shot you can see seven 18" high single areca palms. Today they are over 8 feet tall and boast numerous trunks as they are a clumping palm. Notice the 15 foot palm tree sticking up to the left of the pine tree. That is on the adjoining property and was only 3 feet tall 2 years ago. Now that's what I call progress.

Wednesday, August 25, 2010

REJECTION

Aloha everyone,
As promised were are trying to post about a few new projects, but at the moment blogger is not allowing our photo's to load. We keep encountering "server rejected" each time we try to upload.  Until we can figure out why... the posts are on hold.
Anyone else having this issue?

c+j

Tuesday, August 24, 2010

TUESDAY'S TEXTURE 082410


Sometimes when I am out doing yard work, I get caught up in the beauty of the debris and get sidetracked from my clean up projects. Like this detail of a Ti Leaf as it fades from a brilliant green to this multi-colored and speckled work of art.

We have been hard at work with our design work as well as on a few new projects around the house. Stay tuned for a few new updates on those. Hopefully I can get at least one post done today.

Tuesday, August 17, 2010

TUESDAY'S TEXTURE 081710


These are a pile of Queen Palm seed pods. They encase the seed rack before it opens up displaying small white to yellow flowers. The interior of the pods tend to stay brown while the exteriors fade from the sun. After flowering — seeds turn green then bright orange. The pheasants love the orange seeds and can be seen feasting under the trees quite often. They are the perfect spot to hang the hammocks... when we can.


Love how this one split right down the center.

The queen palm patch in the yard and John trimming away the pods. They are quite dangerous as they are very spear like. It's not unusual to go out and find them speared into the ground after having shot to the ground.

Detail of the green and orange seeds.

SOME of the hundreds of keiki (babies or seedlings) I have in pots for future sale.

Tuesday, August 10, 2010

TUESDAY'S TEXTURE 081010


The almost fur like trunk of the Triangle Palm which literally grows in the shape of a triangle.

Monday, August 09, 2010

CUCKOO FOR COCONUT CAKE


A little while back I made this decadent coconut layer cake, but as you can tell from our lack of post lately, have simply not had the time to post.  It started by first cleaning and prepping a coconut from the tree out front. This is a very dense and heavy cake and one of my all time favorites. I've actually been making this for about 10 years.

Cracking of the coconut and draining the water.
First thing you want to do is remove a bit of the outer green skin and then make an opening to extract the coconut water from. A machete works best for this. Once you have the coconut drained you can remove all of the green skin to reveal the brown hairy looking seed.

Removing the meat of the coconut.
Crack the nut open then, CAREFULLY remove the meat. I take a dull knife and score it in a few places then pry out the smaller chunks.


Once the meat has been removed, peel off the inner brown layer. You can actually eat this as well, but we prefer to remove it.

Once the meat is cleaned, shred with a microplane. You can either leave it to air dry for a few days, making sure to turn it a few times a day or place in the oven on lowest setting to use later. If you want toasted coconut, place in 250 degree oven until it starts to turn a nice golden brown. For this recipe, you will want to use it fresh and moist.
The freshly shredded coconut is added to the batter.
The finished cake layers.
The recipe is as follows:


3/4 pound (3 sticks) unsalted butter, room temperature

2 cups sugar

5 extra-large eggs at room temperature

2 teaspoons pure vanilla extract

1 1/2 teaspoons pure almond extract

3 cups flour

1 1/4 teaspoon baking powder

1/2 teaspoon baking soda

1/2 teaspoon salt

1 cup buttermilk (or 3/4 cup sour cream + 1/4 cup milk)

1 teaspoon lime juice

1/2 teaspoon lime zest

1 cup fresh shredded coconut (or store bought... try to find unsweetened if you can in the bulk section of your local specialty store.)


Preheat the oven to 325 degrees F.

Cream the butter and sugar on high speed until light and fluffy, about 5 minutes. With the mixer on low, add the eggs, 1 at a time, scraping down the bowl after each addition. Add the vanilla and almond extracts and mix well. 

In another bowl, sift together the flour, baking powder, baking soda, and salt. In 3 parts, alternately add the dry ingredients and the buttermilk to the batter, beginning and ending with the dry ingredients. Mix until combined. Fold in 1 cup of fresh coconut.

Lightly grease and flour 2 round cake pans. Fill each with batter. Place on cookie sheet and bake about 35 - 45 minutes or until edges turn golden and toothpick comes out clean. Remove from oven and let cool in pan 15 minutes. Turn out onto cooling racks and cool completely before frosting. you could even chill the cakes if you like since the whole cake will go in the fridge when finished.

These also make great cupcakes:
Line a muffin pan with paper liners filling each to the top with batter. Bake for 25 to 35 minutes, until the tops are golden and a toothpick comes out clean. Allow to cool in the pan for 10 minutes. Remove to a baking rack and finish cooling then frost and top with shredded coconut.
For the frosting:

1 1/2 pounds cream cheese at room temperature
3/4 pound (3 sticks) unsalted butter, room temperature
1 teaspoon pure vanilla extract
1/2 teaspoon pure almond extract
2 pounds confectioners' sugar, sifted

1 1/2 - 2 cups shredded coconut (either toasted or un-toasted)

Meanwhile, make the frosting. On low speed, cream together the cream cheese, butter, and vanilla and almond extracts. Add the confectioners' sugar and mix until smooth.

Frost the top of the first layer and place top layer on. Frost entire cake with remaining frosting.
(I usually have a little extra and freeze it. It's great for any cake and even on brownies.)
I prefer to used toasted coconut for the outside. It gives the cake a nice little crunch. Refrigerate until cool and remove 15 - 20 minutes prior to serving.

Spread plain frosting on one layer and stack 2nd layer on top. Frost entire cake then coat with toasted coconut.

Monday, August 02, 2010

TUESDAY'S TEXTURE 080310


Over that last few years, as we have cleared away brush and piles of mulch, we have found about 20 of these basalt rocks also called vesicular baslat rocks on the property. It is our intent to make our very own Imu or Hawaiian underground oven with our small inventory. We figure we have enough to make a small one to cook a meal big enough for the two of us. We'll make sure to share .

Monday, July 26, 2010

TUESDAY'S TEXTURE 072710

This is a detail of the Mulch that we make. Each time we trim the smaller plants and branches, we cut it up, collect it in a large barrel and use it to spread around new plantings to help keep the soil most, to prevent weeds from coming up as well as acting as erosion control.


Tuesday, July 20, 2010

TUESDAY'S TEXTURE 072010

We are a little behind on TT postings, but we've been a little swamped here at CFC.
Last week the TT post was non-existent and today's is just late. Hopefully this extended TT post will make up for it.


What you see here is the Kalanchoe Beharensis or Elephant's ear Kalanchoe. We have a few of these growing in the yard and the prehistoric looking stalks are spiked and resemble a very tough resin.

The adult plant in bloom
The small flower which bears no scent.
New sprout after flowering.
A small portion of the stalk.

Sunday, July 18, 2010

KISS MY GRITS


I have been looking for these since we moved to Maui 3 years ago. Sure we have polenta on the island but I have never been able to find Grits. I just happened to look up while I was browsing the candy aisle in K-Mart the other day and there they were.  THE CANDY AISLE? REALLY? Can't wait to whip up a batch.

I like mine with salt, butter, lots of pepper and a little sugar.  Sometimes just cheese, salt and pepper will do. How about you? How do you like your grits... other than kissed?

Friday, July 09, 2010

UP-GREYED

Our old car was named Amy after Amy Sedaris...
this one is named Jerri in honor of her Strangers with Candy character, Jerri Blank.

John and I had lightly discussed trading in our car for a new one but never really did much about it. One day we were leaving Costco and I just happened to pick up a brochure on their Auto Program. John came home and reviewed it online, typed in our info and bam.. we got an e-mail from the Island Honda Dealer. We let them know what we wanted... something with a few more bells and whistles but not super fancy. This Wednesday we got a call saying they just received this brand new Charcoal Grey (or as they call it Polished Metal Metallic) Element in. We had an appointment in town on Thursday afternoon so stopped in and took it for a test drive.

There was nothing really wrong with our Blue Version but we thought let's just see what kind of numbers they come back with. The trade in value was quite a bit more than what we owed on the blue one and with the Costco deal as well as lower interest we ended up driving home in a new car with a lot of fun features. All for a much lower monthly payment.

See, you just never know how much money you can save by just stopping in and asking a few questions.


Friday, July 02, 2010

LOCAL WRAPPERS

I finally got around to scanning these two wonderfully retro pieces that have been laying around the office for almost a month now. The top is from one of our local bakeries that is just as stuck back in time as this label suggests. Komoda's has the distinction of being one of the oldest businesses in Makawao center. They used to cater to the GI"s back in the 40s when there were base camps set up all over upcountry Maui. You have to get there early if you want one of their delicious long johns or conn's favorite, the coconut danish. And when I say they are stuck back in time, I mean that in a good way. There are fewer and fewer places like this in the islands that are "living history" and have a certain charm in their no frills way of doing things.


The Ono Cones box is a great display of late 60s typography and the layered silhouetted background "landscape" is so simple and we love the colors. Unfortunately, it's ruined by what seems to be a haphazard addition of the pink "Sugar Cones" box. Which, by the way, is set in squished type... Typesetting design rule: don't squish type! Use a condensed font that is designed to be used in tight areas. And especially don't squish a serif font. How about the "12", fancy right?